Running local coding agents
A walkthrough of getting a coding agent to run entirely on your own machine — no cloud, no API key, no per-token bill. The pieces you assemble (model, server, harness), the exact steps to wire them together on a Linux laptop, the hardware limits you hit, and how far an integrated GPU and an NPU can push them. Half tutorial, half lesson in what these systems are actually made of.
Local AI: a model in a box of its own, peeking out on your side of the wire.
There is a question worth asking every so often about any tool you lean on: could you run it, in full, on the machine in front of you — with the network unplugged, no account, and nobody billing you per token?
It is, more or less, the question Linus Torvalds asked about version control in 2005. When the Linux kernel lost access to the proprietary tool it had been depending on, he wrote — in a matter of days — a system in which every developer holds the entire repository on their own disk. Distributed by design, no central server whose permission you need. Git was, at heart, a refusal to depend on someone else's machine.
Point the same question at AI coding agents and you get a small but revealing project: getting an agent to write code on your own laptop, with the cloud switched off. Sebastian Raschka recently published a thorough guide to running local coding agents on capable hardware — a Mac Mini, a DGX box. What follows walks the same road on a deliberately ordinary laptop, where the constraints end up doing most of the teaching: the pieces you assemble, the steps to wire them together, the hardware limits you run into, and how far the machine can be pushed to clear them.
Why local?
Four reasons come up again and again, and they are worth keeping separate:
- Privacy. The code, the files and the prompts never leave the machine — nothing sent to a third party, cached, or logged elsewhere. That matters the moment the work touches anything sensitive.
- Cost. Once the model is downloaded, running it is free apart from electricity — no per-token bill, no metered API, no surprise when a loop runs all night.
- Control and transparency. The whole stack is open and inspectable: you can see, and change, how it serves, what it sends and what it keeps. No black box, and no model deprecated out from under you.
- Offline. It works with the cable pulled out — on a train, a plane, a cabin in the woods.
And then the reason that actually got me into it, the one no feature list mentions: understanding. Nothing teaches you the parts of a machine like having to assemble it yourself.
What I cannot create, I do not understand.
— Richard Feynman, left on his blackboard, 1988
One ordinary laptop
Before any of that, a caveat, so nobody arrives with the wrong expectations: none of this means local wins today. For the hardest work I still reach for the big hosted models — they are better, and on the frontier it isn't close. Running things locally earns its keep on the tasks and loops where privacy, cost or control weigh more than the last increment of capability — and, for me, as the fastest way to actually understand the stack. Read what follows as how to make local genuinely useful, not how to replace the cloud.
The second thing to be clear about — and the one that matters if you want to reproduce this — is that the machine is deliberately ordinary. It is not a workstation with a rack of GPUs. It is not even a desktop. It is simply one of my laptops: a Framework running Linux (Ubuntu 24.04), with an AMD Ryzen AI 7 350, its integrated Radeon 860M graphics — no dedicated video memory, so it borrows from system RAM — and 32 GB of RAM shared across the whole system. That last number governs almost every decision later: how large a model fits, how much context you can hold, whether the built-in GPU or the CPU ends up doing the work. Where a step depends on this specific hardware I'll say so; the shape of the process holds on any laptop, but the numbers — and the walls — will be yours, not mine.
And a warning, because it is the honest part of the story: getting the most out of a machine like this does not stay at the level of apt install. By the end I am pulling newer firmware, adding my user to the render group, and booting a different kernel to reach a piece of silicon the stock setup quietly ignores. That is not a detour — it is the point where "run AI locally" stops being a slogan and becomes systems work. If that already sounds like more than you want, good news: the first three steps get you a working local assistant without any of it. The kernel-level yak-shaving only starts when you go chasing real speed.
The pieces you're actually assembling
Most developers carry a single blurry mental object labelled "AI that writes code": prompt in, code out, magic in the middle. The first thing local setup does is break that fog into four separable parts.
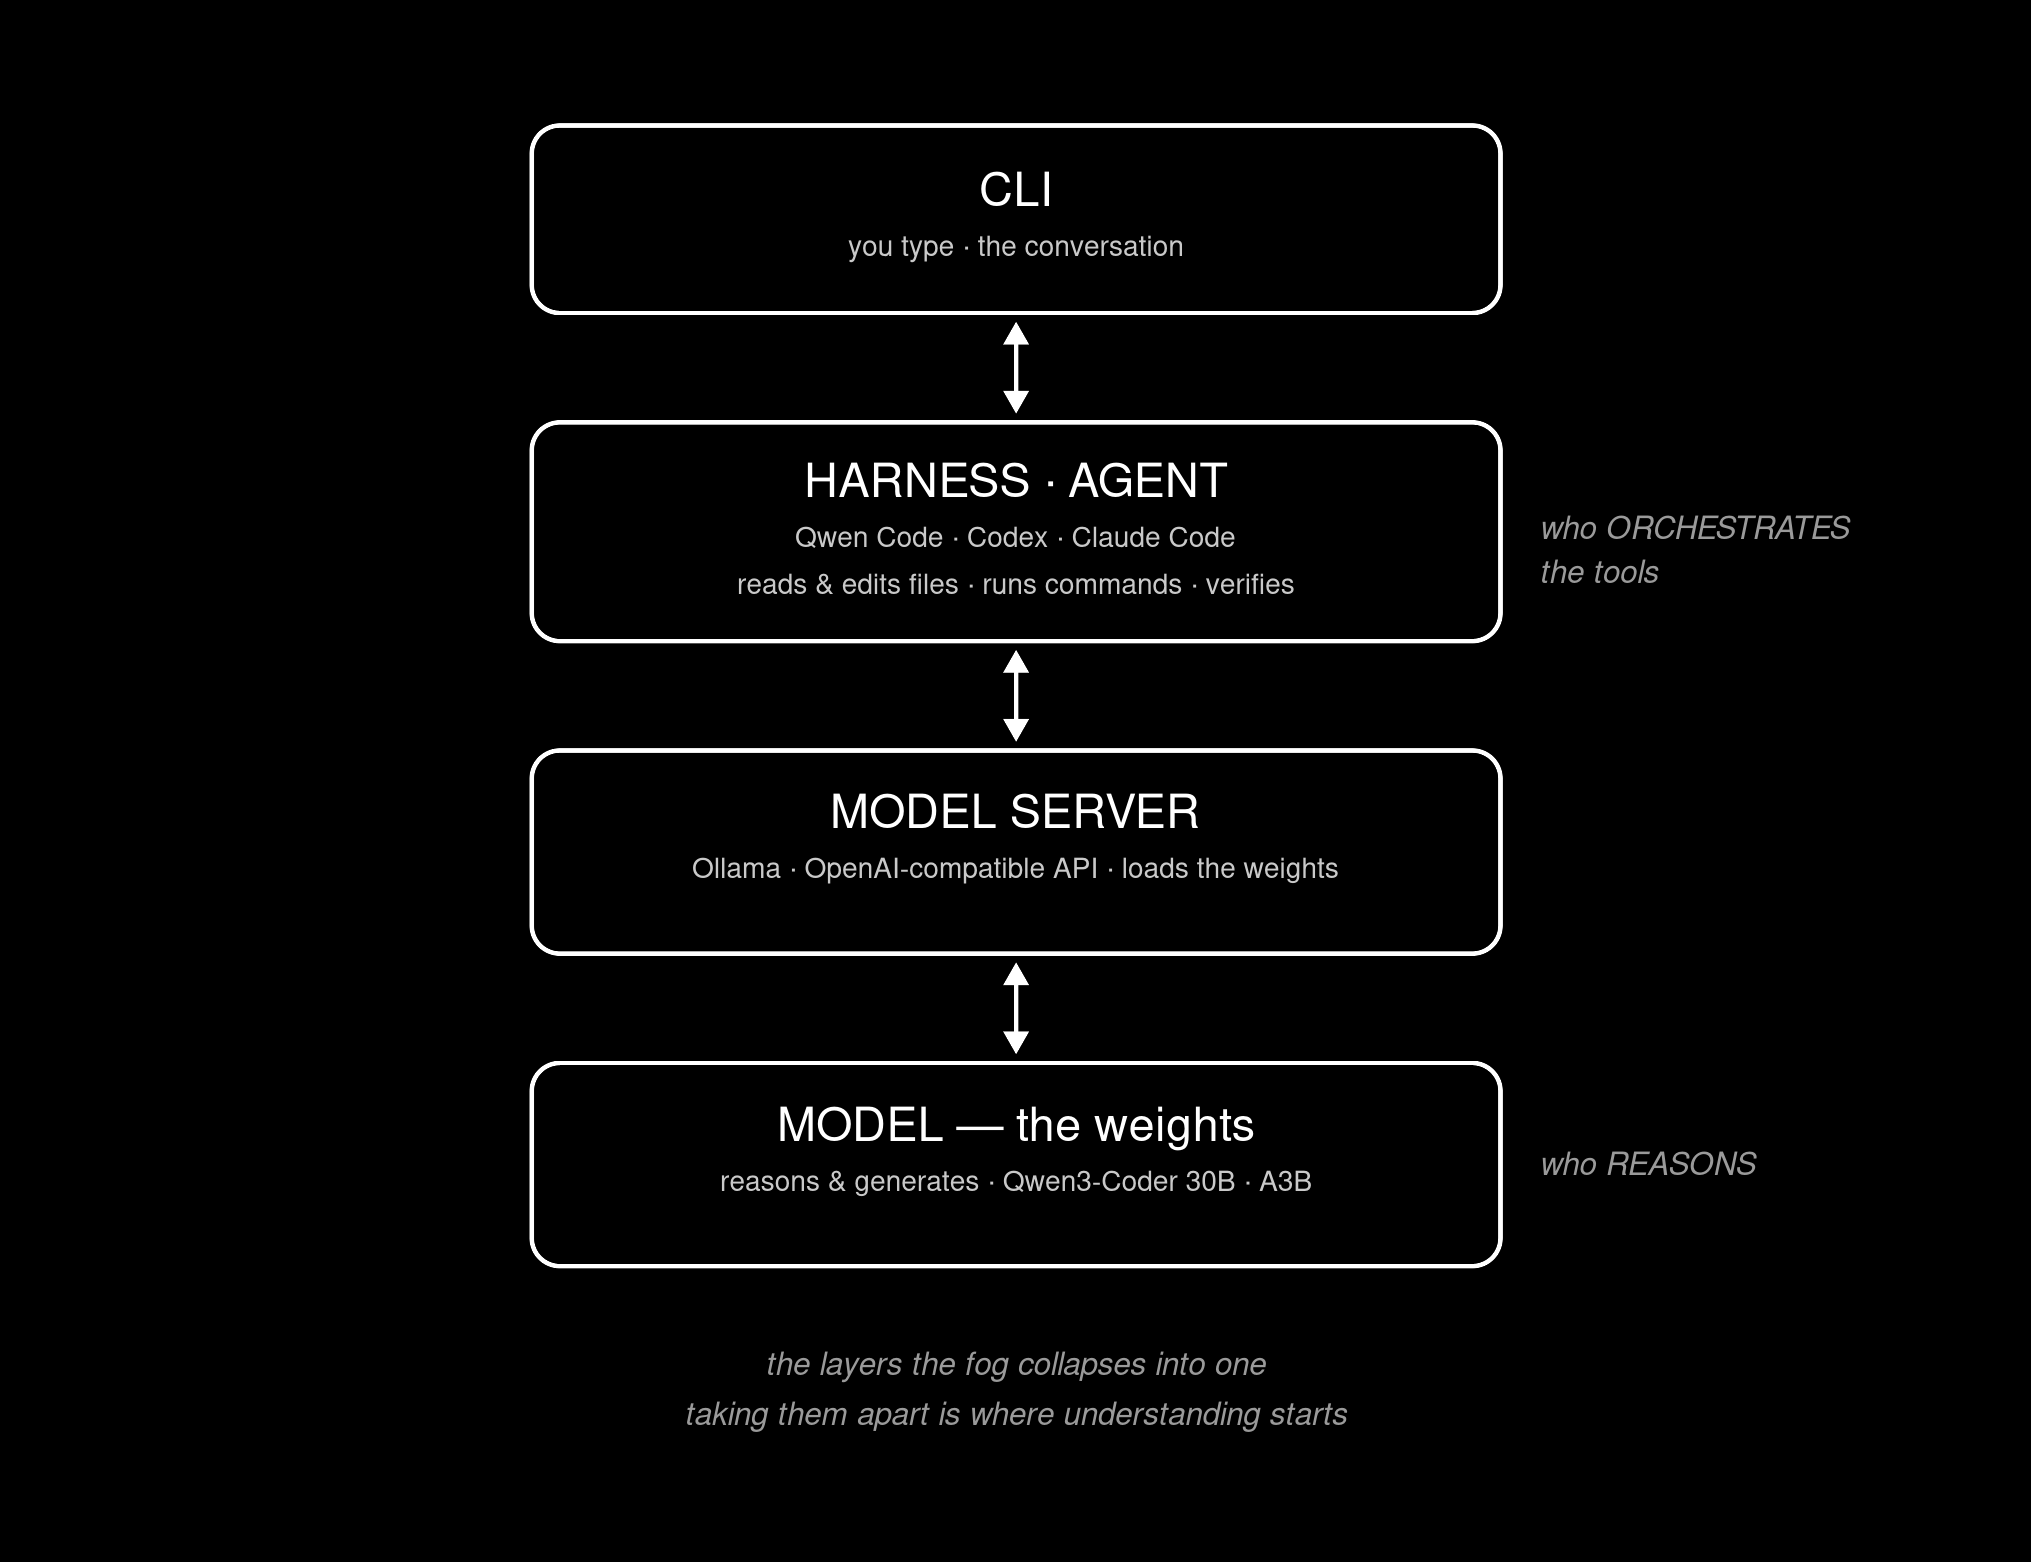 The pieces the fog collapses into one: the CLI you type at, the harness that acts, the model server, and the model itself.
At the bottom sits the model — the weights, the thing that reasons and predicts the next token, and nothing more. Above it, a model server (an inference runtime such as Ollama) loads those weights and exposes them behind an HTTP API. Above that, the harness — the coding agent — is the part that actually does things: it reads and edits your files, runs commands, and checks its own work. And wrapping all of it is a permission model: what the agent is allowed to touch.
The single most useful realization of the whole exercise is that the model is not the harness. The model only ever predicts tokens; everything that makes it feel like an agent belongs to the harness around it. We routinely credit the model for work the harness is doing, and blame the model for the harness's failures. Keeping them separate in your head is the difference between using a black box and understanding a system.
That separation is not just conceptual. Every one of these harnesses — Qwen Code, OpenAI's Codex, Claude Code — is simply a client of an OpenAI-compatible API. So you run one model server and point whichever harness you like at it, swapping the agent without ever touching the model underneath.
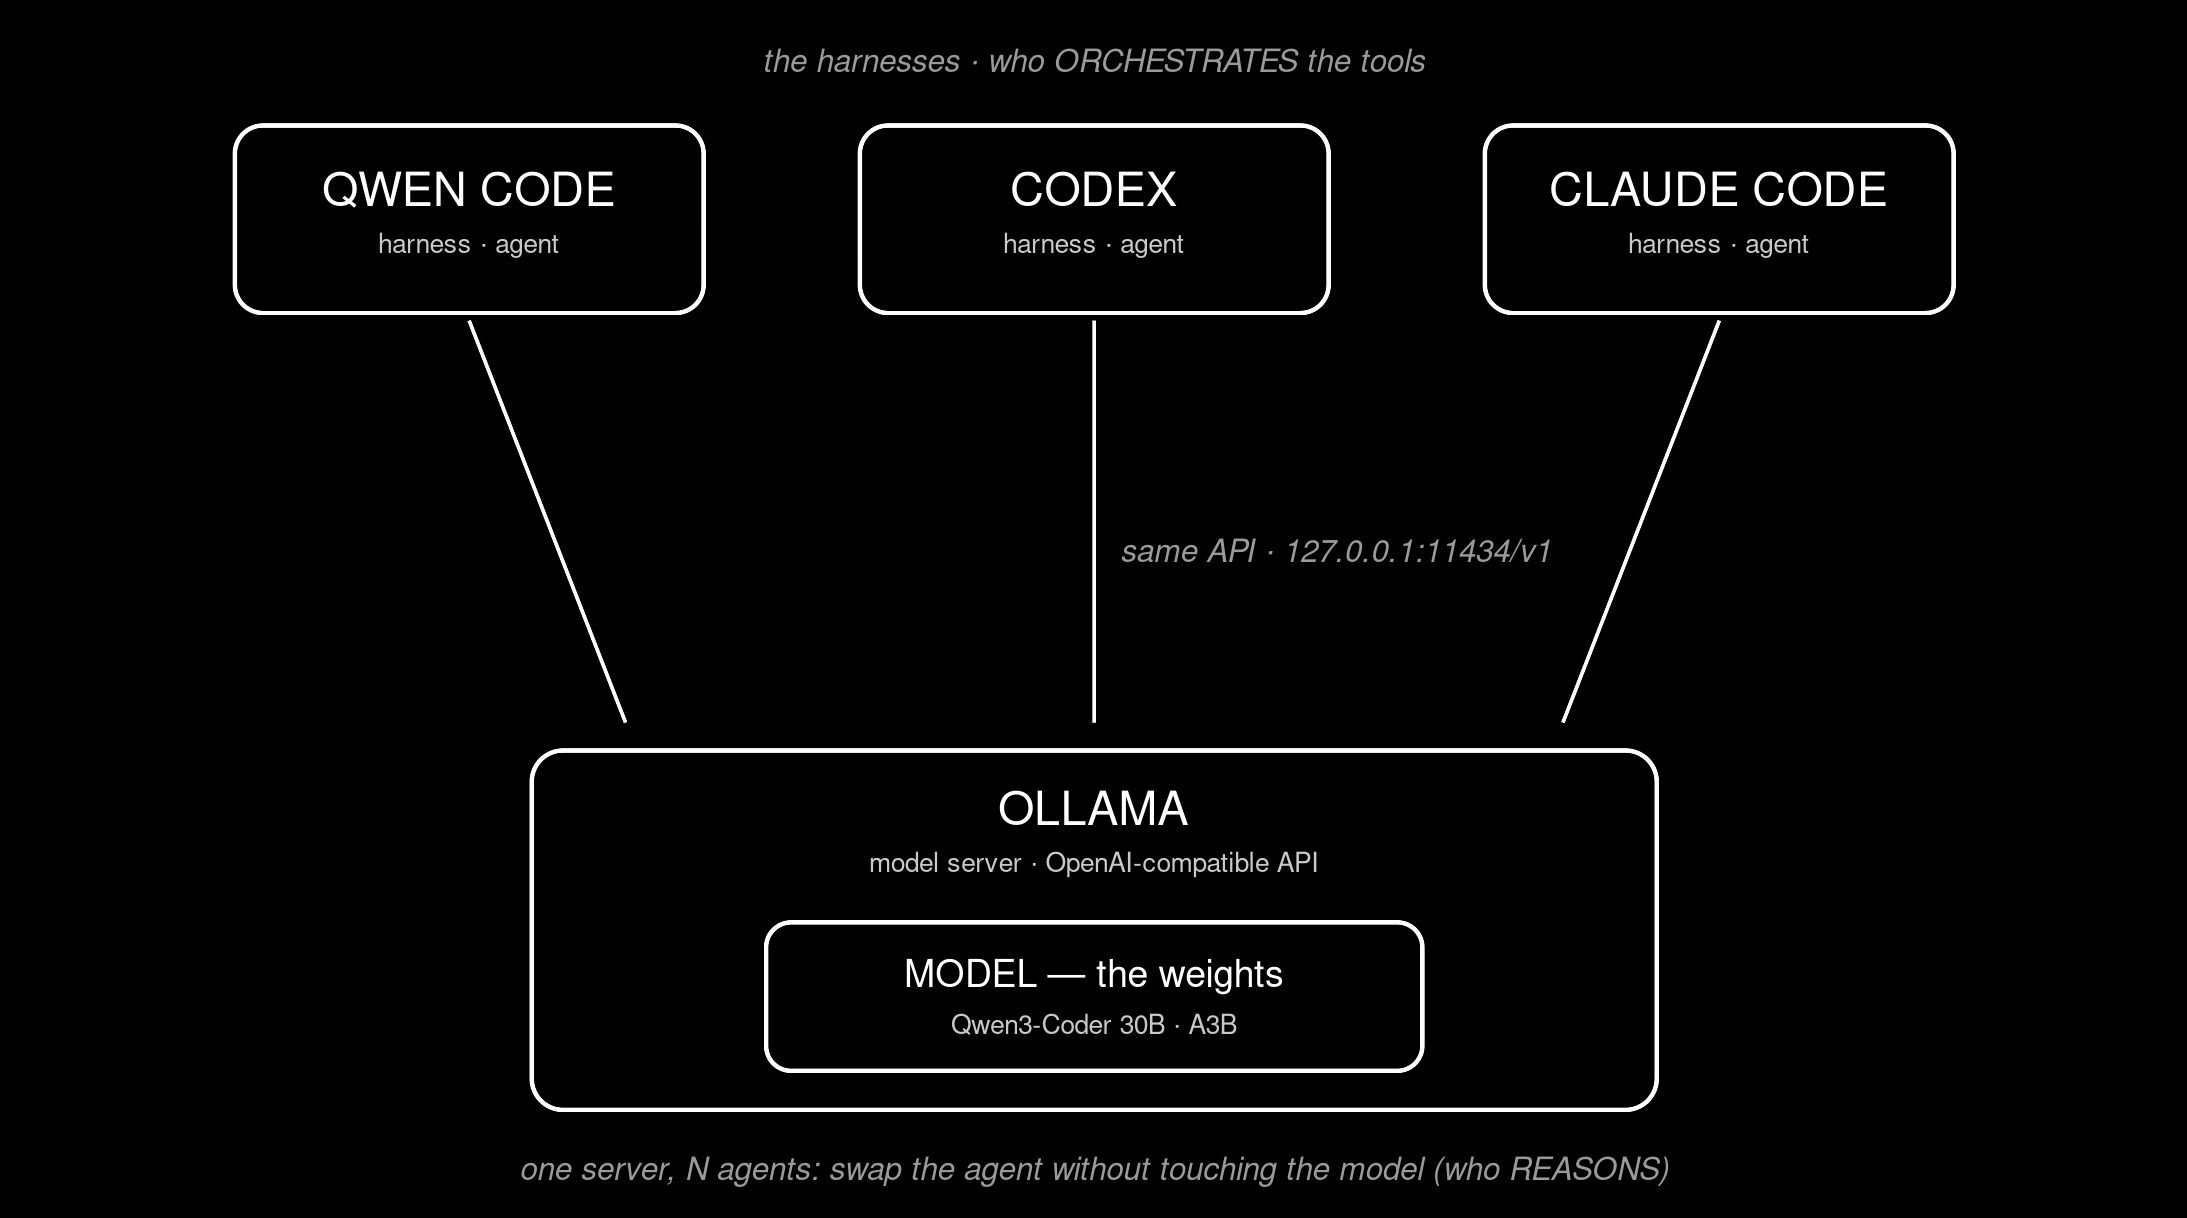 One server, many agents — the model reasons, the harness orchestrates the tools; swap one without touching the other.
With that map in hand, the setup is three steps: stand up a model server, point a harness at it, and then fight your hardware until it's fast enough to be useful.
Step 1 — Stand up a model server
Ollama is the simplest place to start: one binary, an OpenAI-compatible endpoint, easy model swapping.
curl -fsSL https://ollama.com/install.sh | sh
ollama pull qwen3-coder:30b    # a coding MoE, ~18 GB
ollama serve                   # serves on :11434
A note on which model, because it matters more than it looks. qwen3-coder:30b is a Mixture-of-Experts model: about 30 billion parameters in total, but only ~3 billion active for any given token. Keep that number — the active parameters — in mind; it comes back the moment we talk about speed. Once the server is up, you already have a local assistant you can curl for one-shot questions. The hard part is turning it into an agent.
Step 2 — Point a harness at it
Install a harness and aim it at the local endpoint. Qwen Code reads standard OpenAI-style environment variables:
npm install -g @qwen-code/qwen-code@latest
# ~/.qwen/.env
OPENAI_API_KEY=ollama          # any non-empty string
OPENAI_BASE_URL=http://localhost:11434/v1
OPENAI_MODEL=qwen3-coder:30b
Then run qwen — no interactive wizard needed; the .env above is enough to start it headless. Codex works too, pointed at the same server, but here you meet the first real friction, and it's worth stating plainly because it undoes a common assumption: "OpenAI-compatible" is a promise, not a guarantee. In current Codex the provider lives in its own profile file; the old wire_api = "chat" has to become "responses"; the id ollama is reserved, so you rename your own; and because qwen3-coder exposes no "thinking" mode you must set model_reasoning_effort = "none" or every request fails. Here is the profile that actually worked, in ~/.codex/ollama.config.toml:
model = "qwen3-coder:30b"
model_provider = "ollamavk"
model_reasoning_effort = "none"

[model_providers.ollamavk]
name = "Ollama"
base_url = "http://localhost:11434/v1"
wire_api = "responses"
Launch it with:
codex --profile ollama
None of this is hard; all of it is undocumented enough to cost you half an hour — and that half hour is part of the lesson: the layers are real, and they don't quite agree with one another yet.
At this point you have a working local coding assistant. Whether it's a usable agent is entirely a question of speed — and that is where the hardware starts pushing back.
Step 3 — Understand why it's slow (prefill vs decode)
A model generating text does two very different jobs, and a laptop is usually good at one and bad at the other.
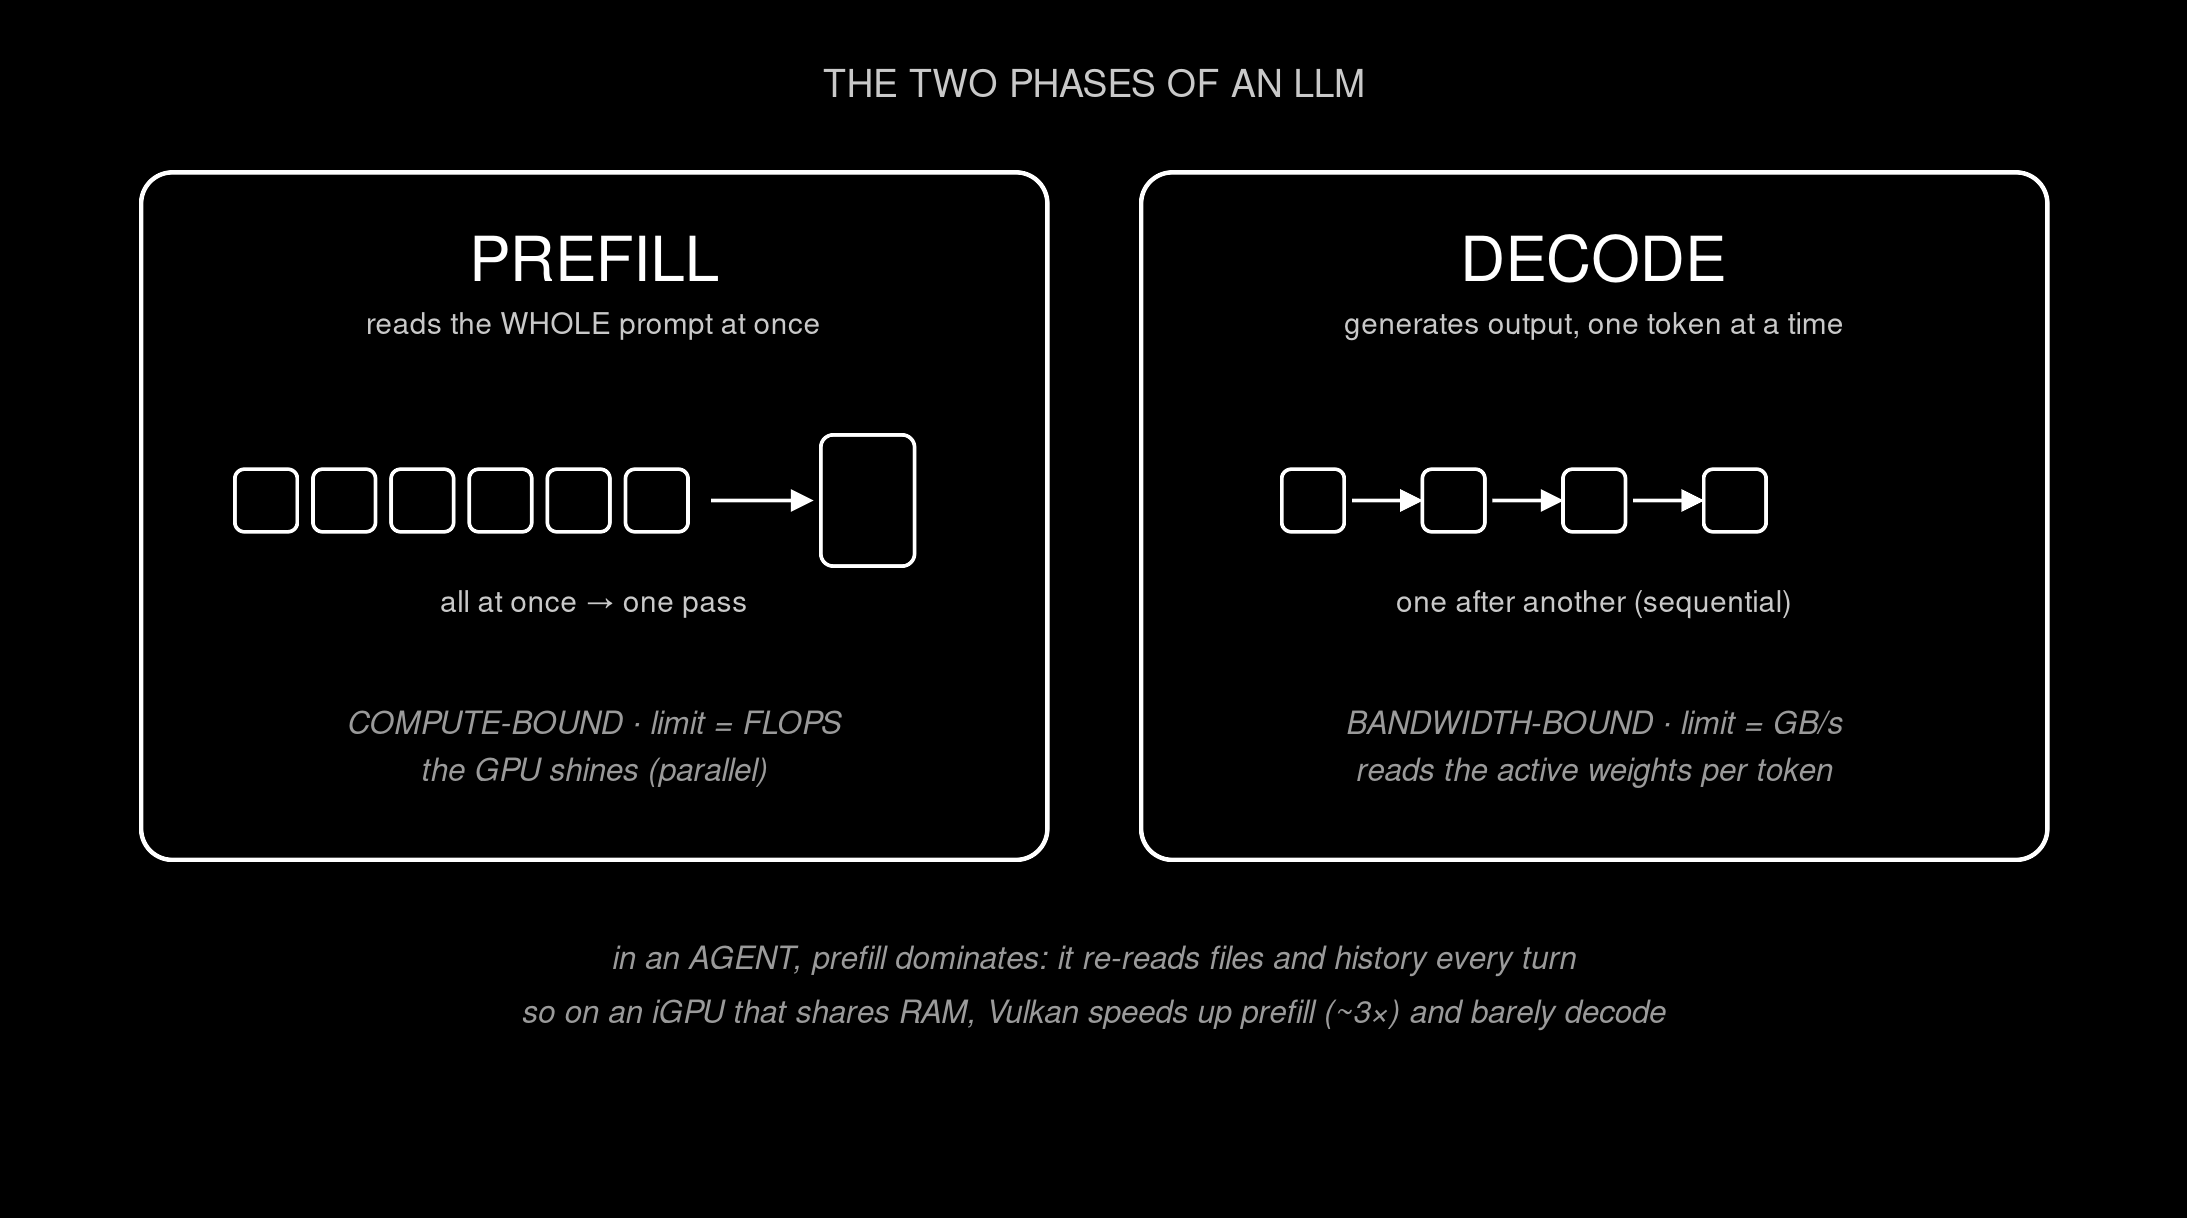 Two phases, opposite bottlenecks: prefill reads the whole prompt at once (compute-bound); decode emits one token at a time (bandwidth-bound).
The first is prefill: the model ingests the entire prompt at once — your files, the history, the harness's instructions — in one big parallel pass. It is compute-bound, limited by raw arithmetic throughput; a GPU shines here. The second is decode: it produces the answer one token at a time, and each new token must read the model's active weights out of memory. It is bandwidth-bound, limited by how fast you can move bytes, not how many sums you can do.
This distinction is the whole game for an agent, because a coding harness re-sends a large system prompt plus a growing history on every single turn. Prefill dominates. And on an integrated GPU that shares the memory bus with the CPU, acceleration helps the phase you'd least expect: on this laptop, turning Ollama's Vulkan backend on roughly tripled prefill and barely moved decode — because the decode bottleneck, memory bandwidth, is identical whether the CPU or the built-in GPU is doing the reading. They drink through the same straw.
Enabling it on this hardware takes two flags, not one — Ollama detects the integrated GPU and deliberately ignores it unless you insist:
OLLAMA_VULKAN=1 OLLAMA_IGPU_ENABLE=1 ollama serve

# memory levers to fit a bigger context:
#   OLLAMA_CONTEXT_LENGTH=16384   (4096 is too small)
#   OLLAMA_FLASH_ATTENTION=1
#   OLLAMA_KV_CACHE_TYPE=q8_0     (~half the KV-cache)
One measurement made the active-parameters point concrete. A dense 14-billion model — small enough to fit entirely in the integrated GPU — decoded slower than the 30-billion MoE, because a dense model reads all 14B parameters per token while the MoE reads only its ~3B active ones. On bandwidth-limited hardware, decode speed is governed by active parameters, not total size. The counterintuitive rule for a laptop: reach for a big MoE with few active parameters, not a small dense model.
The wall, and how to choose a model around it
Then you hit the wall. An agent wants a large context window — 16 to 32 thousand tokens. A large window needs a large key-value cache, and that cache plus the weights has to fit in the sliver of memory the integrated GPU can address (about 16 GB here). Push the window up and the whole thing spills out of that sliver, collapses back onto the CPU, and nearly exhausts system RAM. On this machine you cannot have both a big context and GPU acceleration at once.
That sets up a pincer when you try to actually run a task:
- The small 8B model fits comfortably in a big context — but it's not clever enough, and hallucinates its way through anything multi-step.
- The capable 35B MoE reasons correctly — but a large file plus the harness's own ~16k-token prompt overflows the 32k window before it can act.
Too small to think; too big to fit. The practical resolution is the third member of a triad we'll come back to: keep the task small — bounded files, a light-enough harness — so a capable model has room to work.
Step 4 (going further) — Put it on the NPU
On CPU and integrated GPU, the honest verdict is that autonomous agent loops are impractical: the harness's system prompt alone can take minutes just to prefill, and a trivial task times out before the model acts once. The prefill wall needs real hardware. On an AMD Ryzen AI chip that hardware is already in the laptop: the NPU (its XDNA neural engine), which is built precisely for the compute-bound work that prefill is.
Getting to it, on Linux today, is the least plug-and-play part of this whole piece — and worth spelling out, because it is a fair warning as much as a recipe. Using FastFlowLM (an NPU-first runtime) meant, in order: booting a newer HWE kernel (7.0) that carries the native amdxdna driver; installing a firmware new enough for it (≥1.1, pulled from the project's package repository — the stock one was too old); the XRT userspace; raising the memory-lock limit to unlimited; adding my user to the render group so it could open the NPU device; and, because Secure Boot was on, enrolling a signing key (a MOK) by hand at the next boot. Two reboots in total. A long way from ollama pull.
But it works, and the payoff is not subtle. FastFlowLM exposes the same kind of OpenAI-compatible endpoint, so the harness doesn't know the difference:
flm serve qwen3:8b --pmode turbo # on the NPU
| Backend | Prefill | Same 5,978-token prompt |
|---|---|---|
| CPU (Zen 5) | ≲11 tok/s | > 560 s (timed out) |
| Vulkan · integrated GPU | 32 tok/s | 184 s |
| NPU (XDNA) | ~390 tok/s | 15 s |
Roughly 35× the CPU and 12× the integrated GPU, on prefill — the exact bottleneck that made agents impractical. A prompt that used to time out is digested in fifteen seconds. Decode stays around 11 tokens per second, unchanged, because that's bandwidth-bound and the NPU doesn't change the memory bus — but decode was never the problem. Fed a realistic agent turn — system prompt, tool schemas, a task, close to ten thousand tokens — the model prefills it in seconds and emits a correct tool call. The loop has gone from impossible to possible.
What the agent is allowed to touch
The fourth piece — the permission model — is the one it's tempting to skip and the one that bites. A coding harness is not a chatbot: it reads and edits your files and runs shell commands. That is the whole point, and also the whole risk, so two things are worth settling before you let it run on its own.
First, know what leaves the machine. The open harnesses (Qwen Code, Codex) can actually be read — you can see what they send — and it turns out some of them phone home by default: Qwen Code ships usage telemetry to its vendor's servers unless you say otherwise. One file settles it:
// ~/.qwen/settings.json
{
  "privacy":   { "usageStatisticsEnabled": false },
  "telemetry": { "enabled": false, "logPrompts": false }
}
Second, decide where it must stop. When an agent runs unattended, the line that matters is between the reversible and the irreversible. The rule for the run below is exactly that: the agent may do everything up to opening a pull request — branch, edit, commit, git push, all of it undoable — but the merge stays with a human, because on our repository a merge to main auto-deploys to production. That boundary is the difference between an autonomous loop you can use and one you can't turn your back on.
The payoff: a real end-to-end run
With that boundary set, the test worth running is the full loop: let the local agent edit some documentation and open a pull request on its own — everything up to the PR, nothing past it.
The pincer from earlier decides the outcome. Point the capable 35B model at a large doc file and it reasons correctly but overflows the window before it can act. Point it at a small file — and forbid it from opening the large ones — and it closes the loop, verified in git rather than narrated: a real working tree, a real branch pushed to origin, a real one-line commit tightening a sentence, and a real pull request left open, waiting for a human, exactly where it was told to stop.
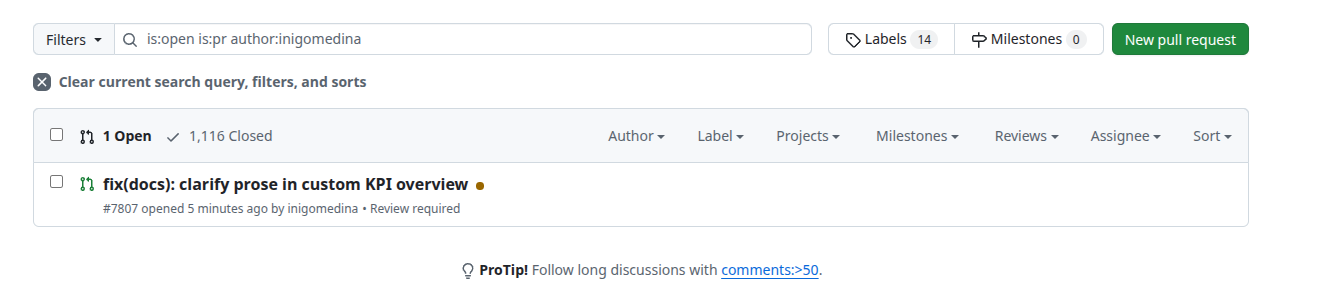 The result in git rather than in prose: a single open pull request — #7807 — opened by the local agent, among more than a thousand it didn't.
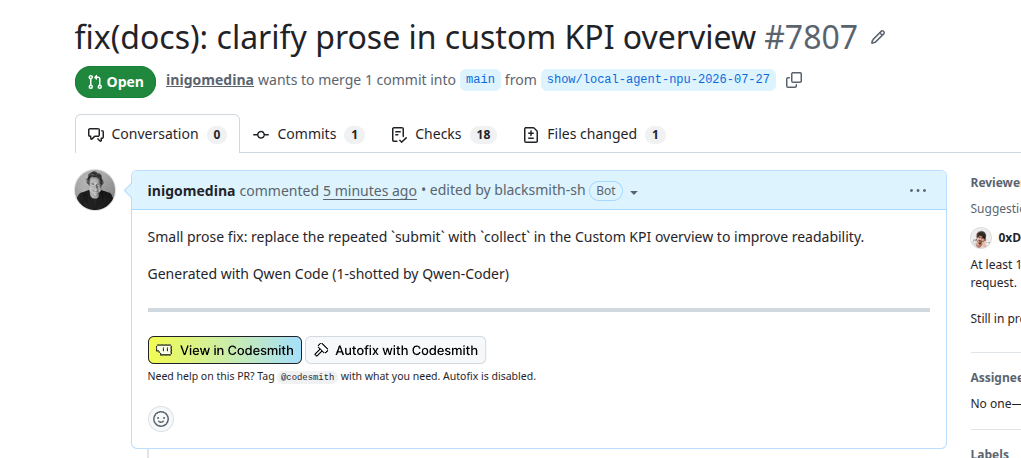 One commit on its own branch, its description written by the model itself ("Generated with Qwen Code"), stopped at "Review required" — the merge left to a human, by design.
So the recipe for a local coding agent that actually closes the loop is a triad: fast prefill (here, the NPU), a capable model (a large-enough MoE), and a context budget that fits (a light harness and bounded tasks). Miss any one and it breaks. Which also means the "wall" was never absolute — it was a budget, and with the right piece in each slot you clear it.
| Setup | Agentic loop |
|---|---|
| CPU / integrated GPU · 30B | impossible — a bare echo timed out at 3 min |
| NPU · 8B | fast, but hallucinated the multi-step task |
| NPU · 35B MoE · large file | fast and correct, but overflowed the context window |
| NPU · 35B MoE · small file | ✅ a real pull request, end to end |
Why do this at all
None of the real learning was in the config files. It was in watching one blurry idea come apart into a model, a server, a harness and a permission boundary — and in discovering that you don't specify what these systems can do so much as find out, by evaluating them. That is the transferable skill: seeing the system in layers, and knowing how to test whether it actually works.
There is a quieter point underneath the benchmarks, too. For a decade or so, developers mostly stopped thinking about their machines' specifications — everything was fast enough, and the constraints had moved to the network. Running a model locally drags the old questions back into the room: how much memory, how much bandwidth, which accelerator. A lot of people are rediscovering, with some surprise, that this matters again — and that the frontier of it, on Linux, is still pioneer country, where the reward for the yak-shaving is a 35× speedup and the price is two reboots.
In an earlier piece I argued that a model is a kind of vinyl record — an object you can own but cannot read. This walkthrough is the same move one layer up: take the thing everyone treats as a single fog and name its parts until it becomes a machine you can reason about. It runs slower than the cloud, and rougher, and for now it only closes the loop on small tasks. But it runs on the computer in front of me, with a cable I could pull out of the wall — and, like Torvalds pulling version control onto every developer's disk, that turns out to be a very good place to start understanding something.